
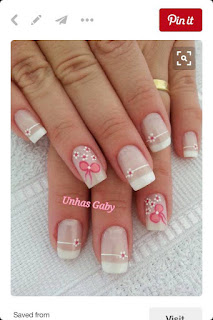
It's been a long time since I posted a nail art design here on my blog. The reason is because my cuticles have been sooo terrible I didn't even want to go there. However, they're much better now, so I did this nail design for you, step by step, as always. It's Pinterest inspired, once again, and here is the original pin:
What I used for this nail art:

Base: Essence studio nails pro white hardener
White: Manhattan Pro French Tip Whitener in 11A
Nude: Essence Nude Glam in 03 cotton candy
Violet: Catrice Cosmetics in Lucky In Lilac
Pink: Max Factor Glossfinity in 120 disco pink
Top coat: Essence colour&go in 101 absolute pure
Step 1:

As always, I prepped my nails by filing them and applying base coat, and then I applied white on the tips of my nails on all of them except my ring finger and my thumb.
Step 2:

I applied a milky-nude (not opaque) colour on all of my nails 2 coats, and on my ring finger and thumb 3 coats.
Step 3:

I drew a horizontal line on the 3 nails with a french tip and on the inner end of it I drew a tiny 4-dot flower. On the nails without the french tip, I drew 4 little 4-dot flowers on the bottom inner corner of the nails. I was going to draw a thinner line, but I couldn't do it :D
Step 4:

I put a hot pink dot in the centre of each flower. (Yes, I messed up the middle finger. Yes, I was furious.)
Step 5:

I drew bows with a pink nail polish, and then filled the loops with a purple colour. And then I added the top coat, and the design is done!

And that's it!
Did you miss my nail art posts? :D Do you want me to do more? Do you like this one?
Thank you for reading!
See you soon xx
No comments:
Post a Comment
Thank you for your lovely comment :) Please don't ask f4f